Media Management
The HyperStudy platform provides a comprehensive media management system for organizing, uploading, and using videos and images in your experiments. The system includes folder organization, tagging, and sophisticated permission controls for sharing media across research teams.

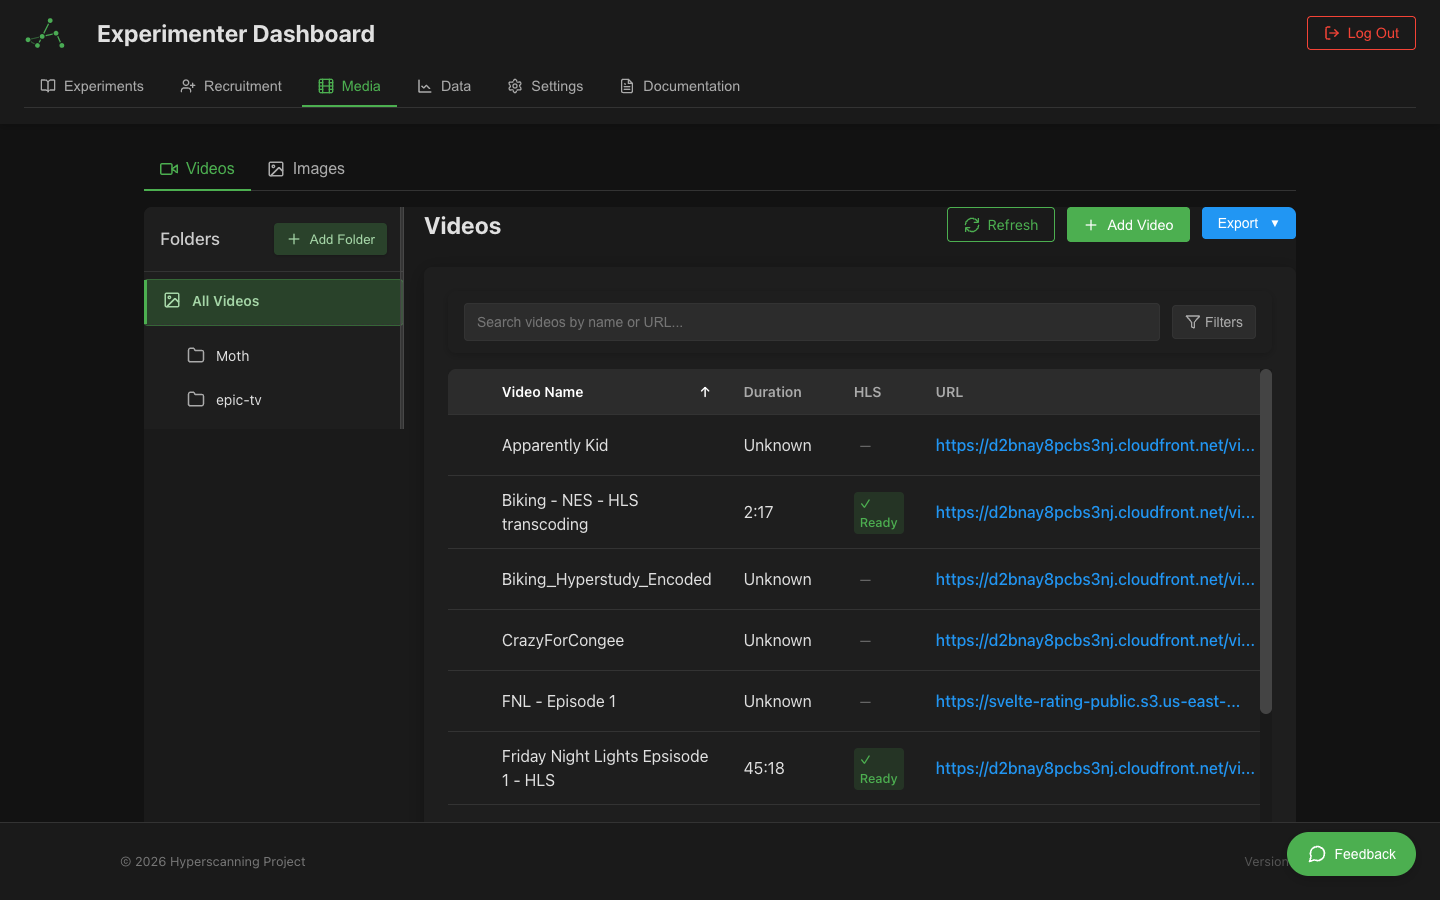 Video management interface showing folder structure and video library with URLs and metadata
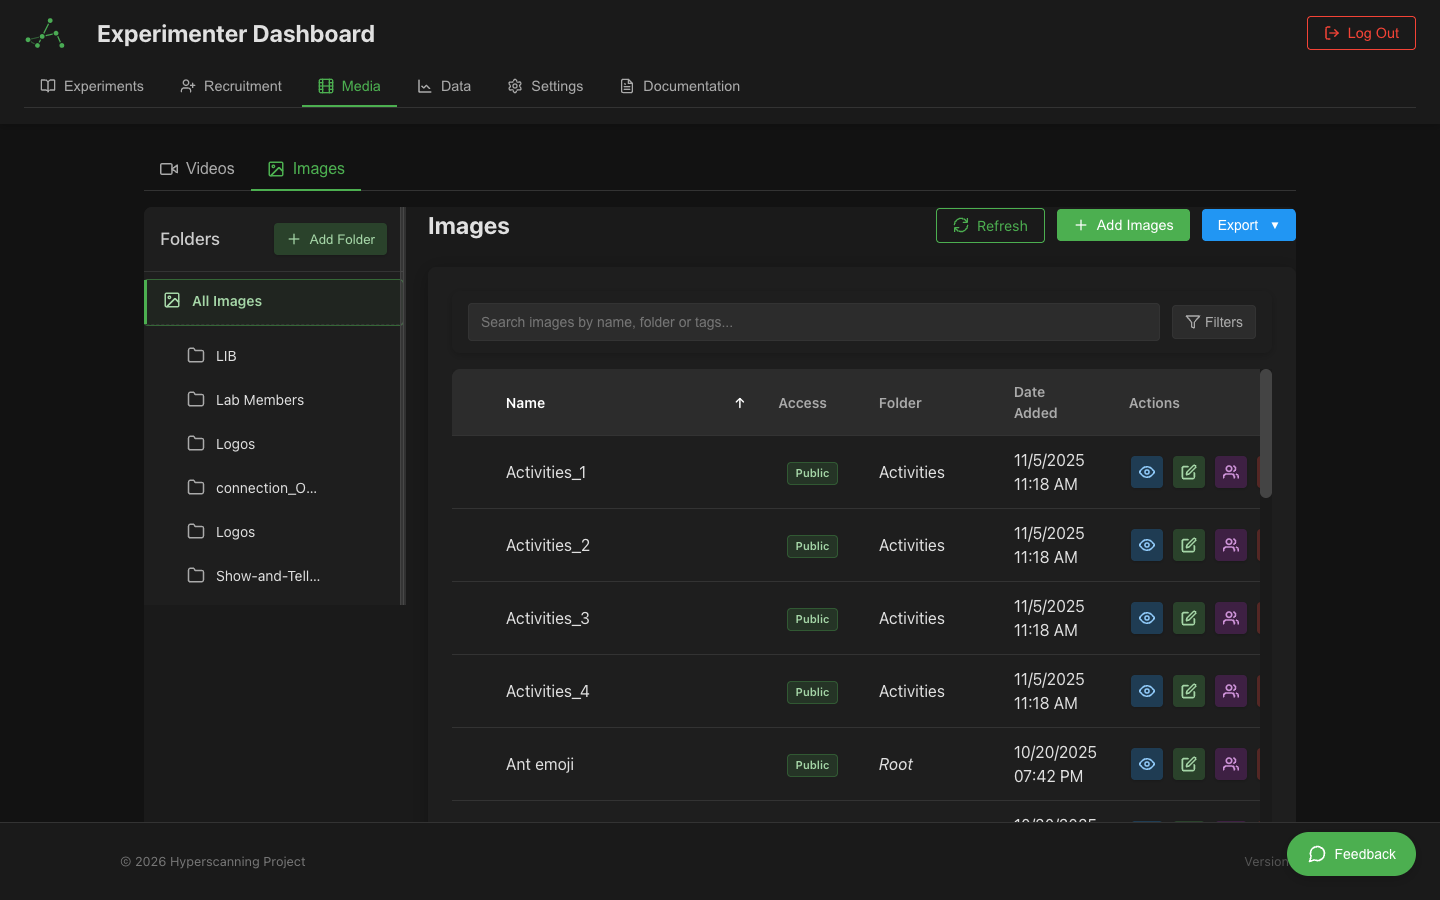 Image management interface with grid view and folder navigation
Media Types
The platform supports two primary types of media:
Images
- Supported formats: JPG, PNG, GIF, SVG
- Maximum file size: 10MB per image
- Recommended resolution: 1920x1080px or smaller
- Common uses: Visual stimuli, diagrams, instructions
Videos
All videos must be uploaded to the platform for security, performance, and HLS streaming support:
Platform-Hosted Videos
- Security: Videos use signed URLs that are not publicly accessible
- Privacy: URLs are only valid for authorized users and expire after 3 hours
- HLS Streaming: Automatic transcoding to adaptive bitrate HLS format via AWS MediaConvert
- Performance: Optimized for all connection speeds with automatic quality adaptation
- Precaching: Automatically precached for optimal loading and synchronization
- Accepted formats: MP4, WebM, OGG, MOV, AVI, MKV, M4V
- Recommended format: MP4 (H.264 video, AAC audio, yuv420p chroma)
- Maximum file size: 10GB per video
- Large file support: Files over 100MB automatically use multipart upload for reliability
- Long video support: Videos over 1.5 hours are fully supported
- Recommended resolution: 1080p (1920x1080) or smaller
External URL support has been removed to ensure all videos benefit from:
- HLS adaptive streaming for smooth playback on any connection
- Automatic format conversion eliminating browser compatibility issues
- Consistent security with signed URL protection
- Reliable synchronization for multi-participant experiments
HLS Adaptive Streaming
All uploaded videos are automatically transcoded to HLS (HTTP Live Streaming) format, providing adaptive bitrate streaming for optimal playback on any connection:
How It Works
- Upload: You upload your video in any supported format (files over 100MB use automatic multipart upload)
- Automatic Transcoding: AWS MediaConvert transcodes to multiple quality levels (360p, 480p, 720p, 1080p)
- HLS Ready: Processing time varies by video length:
- Short videos (under 30 min): 2-5 minutes
- Medium videos (30-90 min): 5-15 minutes
- Long videos (over 90 min): 15-45 minutes
- Smart Playback: The player automatically selects the best quality based on viewer's connection
HyperStudy uses AWS MediaConvert for transcoding, which has no timeout limit. This means videos of any length can be processed, including multi-hour recordings that were previously unsupported.
Benefits
- No buffering: Automatic quality adjustment prevents pauses on slow connections
- Near-instant playback: Segment-based loading means video starts almost immediately
- Bandwidth efficiency: Adapts bitrate to the viewer's connection in real-time
- Reliable sync: Consistent playback across all participants in multi-participant experiments
- Universal compatibility: H.264 output works in all modern browsers
Quality Levels
Videos are transcoded to multiple resolutions based on the source quality:
| Resolution | Bitrate | When Used |
|---|---|---|
| 360p | 800 kbps | Slow connections (< 2 Mbps) |
| 480p | 1,400 kbps | Standard mobile connections |
| 720p | 2,800 kbps | Normal broadband |
| 1080p | 5,000 kbps | Fast connections |
HLS Status Indicators
In the Video Manager, each video shows its HLS transcoding status with color-coded badges:
| Status | Color | Meaning |
|---|---|---|
| Ready | Green | HLS streaming available and working |
| Processing | Blue (with spinner) | Currently transcoding |
| Pending | Yellow | Waiting to start transcoding |
| Failed | Red | Transcoding error (see below for retry) |
Retrying Failed Transcodes
If a video's HLS status shows Failed:
- Hover over the status badge to see the error details
- Click the retry button (circular arrow icon) next to the status
- The status changes to "Pending" and transcoding restarts
- Monitor progress in the HLS status column
Common failure reasons:
- Unsupported codec: Convert source to H.264 MP4 and re-upload
- Corrupted file: Try re-uploading the original file
- Processing error: Click retry; usually succeeds on second attempt
Video Format Recommendations
With HLS transcoding enabled, format compatibility issues are largely eliminated. The transcoder converts all uploads to browser-compatible H.264 with yuv420p chroma subsampling. However, uploading in recommended formats ensures the best source quality.
Recommended Formats (Best Compatibility)
For maximum browser compatibility and reliable playback across all features:
-
MP4 (H.264 video codec, AAC audio) ⭐ RECOMMENDED
- Encoding requirements:
- Video codec: H.264 (x264)
- Audio codec: AAC
- Chroma subsampling: yuv420p (critical for Firefox)
- Container optimization:
-movflags +faststartflag
- Why: Universal browser support, optimal for web playback
- Best for: All experiments, especially those with sparse rating or timestamp jumping
- Encoding requirements:
-
WebM (VP8/VP9 video, Vorbis/Opus audio) ✅ GOOD ALTERNATIVE
- Full browser support
- Open format
- Good compression
Example FFmpeg command for optimal MP4:
ffmpeg -i input.mov -c:v libx264 -pix_fmt yuv420p -preset medium -crf 23 \
       -c:a aac -b:a 128k -movflags +faststart output.mp4
Problematic Formats (May Cause Issues)
The following formats may cause playback errors in Firefox and other browsers, particularly when using features that require precise video seeking (sparse rating, timestamp-based state transitions):
MOV (QuickTime) ⚠️ Compatibility Warning
Issues:
- Limited Firefox support: Often fails with "Video can't be played because file is corrupt" error
- Chroma subsampling incompatibility: Many MOV files use yuv422p or yuv444p chroma subsampling, which Firefox cannot decode (Firefox only supports yuv420p)
- Partial codec support: Firefox has limited QuickTime container support
MOV files may fail to seek in Firefox when served via signed URLs, even if initial playback works. This is due to Firefox's strict handling of range requests combined with QuickTime container limitations. The issue is especially problematic for experiments using:
- Sparse Rating (pause/resume at specific timestamps)
- Multi-state video segmentation (different time ranges across states)
- Any timestamp-based seeking
Solution: Convert MOV files to MP4 with yuv420p chroma subsampling before uploading. MP4 files work reliably with signed URLs in all browsers.
Impact on experiments:
- ❌ Sparse Rating Component: May fail when pausing/resuming at specific timestamps
- ❌ Multi-state experiments: May fail when transitioning between states using different time segments of the same video
- ❌ Seek operations: May crash decoder when jumping to specific timestamps
- ❌ Signed URL + MOV: Firefox cannot reliably seek to timestamps in MOV files served via authenticated URLs
- ⚠️ Inconsistent behavior: Works in Chrome/Safari but fails in Firefox
When uploaded, you'll receive a warning recommending conversion to MP4.
AVI ❌ Not Recommended
Issues:
- No browser support: Not supported by modern browsers
- No native HTML5 support: Cannot play in Firefox, Chrome, or Safari
- Will not work: Guaranteed playback failure
Action required: Convert to MP4 before uploading.
MKV (Matroska) ⚠️ Limited Support
Issues:
- Very limited browser support: Only experimental support in Firefox Nightly builds
- Not production-ready: Should not be used for participant-facing experiments
- Inconsistent playback: May work in some browsers but fail in others
When uploaded, you'll receive a warning recommending conversion to MP4.
M4V ⚠️ Potential Issues
Issues:
- Similar to MOV: Can have same chroma subsampling problems
- Codec-dependent: Compatibility depends on encoding settings
- May fail in Firefox: If encoded with yuv422p/yuv444p
When uploaded, you'll receive a warning. Test thoroughly before using in experiments.
Why These Issues Occur
Technical explanation: Firefox's video decoder only supports YUV 4:2:0 chroma subsampling for H.264 videos. Many professional video cameras and editing software export MOV files with YUV 4:2:2 or YUV 4:4:4 chroma subsampling for higher color fidelity. While these higher-quality formats work fine in standalone media players, they cause Firefox's browser-based decoder to fail with a MEDIA_ERR_DECODE error.
Additional Firefox + Signed URL complexity: Platform-uploaded videos use signed URLs for security. These time-limited, authenticated URLs protect your proprietary content but can interact poorly with Firefox's video decoder when combined with incompatible formats. When Firefox attempts to seek to a specific timestamp in a MOV file served via signed URL, it may fail to properly re-request video segments, causing playback errors even if the initial load succeeded. MP4 files with yuv420p chroma subsampling do NOT have this issue - they work reliably with signed URLs in all browsers including Firefox.
This is particularly problematic for:
- Timestamp-based features: Seeking to specific video times (used in sparse rating)
- Video segmentation: Playing different time ranges of the same video across multiple states
- Multi-participant sync: When Firefox participants cannot decode the video
- Signed URL + MOV combination: Firefox may fail to seek even if initial playback works
Upload Warnings System
When you upload a problematic format, the system will warn you:
Warning severity levels:
- 🔴 Error (AVI): Format will not work, conversion required
- 🟡 Warning (MOV, MKV, M4V): Format may not work in all browsers
Warning message includes:
- Specific compatibility issues
- Browsers affected
- Recommended formats
- Note that sparse rating and timestamp features may fail
Your options:
- Convert to MP4 (recommended): Use FFmpeg or video editing software
- Upload anyway: For testing or if you know all participants use compatible browsers
- Cancel: Choose a different file
Converting Videos to Compatible Format
If you have MOV, AVI, or other problematic files:
Quick conversion (preserves quality):
# Convert MOV to web-optimized MP4
ffmpeg -i input.mov -pix_fmt yuv420p -c:a copy -movflags +faststart output.mp4
Full conversion (with compression):
# Convert any format to optimized MP4
ffmpeg -i input.mov -c:v libx264 -pix_fmt yuv420p -preset medium -crf 23 \
       -c:a aac -b:a 128k -movflags +faststart output.mp4
What these flags do:
-pix_fmt yuv420p: Ensures Firefox-compatible chroma subsampling-movflags +faststart: Optimizes for web streaming (moov atom at start)-preset medium: Balances encoding speed vs compression-crf 23: Constant quality (lower = higher quality, 18-28 typical range)
Need help? Many free tools can convert videos:
- HandBrake (free, cross-platform GUI)
- FFmpeg (free, command-line)
- Online converters (for smaller files)
Testing Video Compatibility
Before using a video in an experiment with sparse rating or timestamp features:
- Upload the video to the platform
- Check for warnings during upload
- Test in Firefox:
- Create a simple test experiment
- Add the video to a state with timestamp segmentation (e.g., startTime: 0, endTime: 15, then second state startTime: 15, endTime: 30)
- Run the experiment in Firefox
- Verify no "corrupt file" errors when transitioning between states
- Test sparse rating: If using sparse rating component, test pause/resume functionality in Firefox
Media Library
Accessing the Media Library
There are multiple ways to access the media library:
-
From the Admin Dashboard:
- Navigate to your dashboard
- Click the "Media" button in the sidebar
- Toggle between "Videos" and "Images" tabs
-
From the Experimenter Dashboard:
- Access your experimenter view
- Navigate to the Media section
- Browse available media based on your permissions
-
During Experiment Design:
- When configuring an Image or Video component
- Click "Browse Library" or "Select Media" in the component properties
- This opens the media selector interface with filtering options
Library Organization
The media library provides sophisticated organization features:
-
Folder Structure:
- Create nested folders for hierarchical organization
- Folders visible in the left sidebar
- Quick navigation with breadcrumb trail
- Add new folders with the "Add Folder" button
-
Media Information:
- Direct URLs for each media item
- File metadata (size, format, duration for videos)
- Upload date and owner information
- Usage tracking across experiments
-
Search and Filters:
- Search by filename, URL, or description
- Filter by media type, date range, or owner
- Export options for bulk operations
- Pagination for large libraries
Uploading Media
Image Upload
To upload images:
- Navigate to the Images section of the Media Library
- Click the "Upload" button
- Select one or more image files from your device
- Alternatively, drag and drop files into the upload area
- Add metadata (title, description, tags) during upload
- Assign to folders and set permissions
- Click "Upload" to complete the process
Video Upload
Upload videos directly to HyperStudy's secure storage:
- Navigate to the Videos section
- Click the "Add Video" button
- Drag and drop your video file or click to browse
- Supported formats: MP4, WebM, MOV, AVI, MKV, M4V (all converted to HLS)
- Add metadata during upload (title, description, tags)
- Select target folder and set permissions
- Monitor upload progress
Large File Uploads
For files larger than 100MB, HyperStudy automatically uses multipart upload:
- Chunked transfer: Large files are split into smaller parts (up to 4 concurrent uploads)
- Resume capability: If upload is interrupted, it can resume from where it left off
- Progress tracking: See detailed progress for each chunk
- Maximum size: 10GB per video
The system now supports videos of any length. Multi-hour recordings (e.g., 2-3 hour lectures) are fully supported thanks to AWS MediaConvert's unlimited processing capability.
What Happens After Upload:
- Immediate: Upload completes and video metadata is stored
- Automatic transcoding: HLS transcoding begins (processing time depends on video length)
- Ready: Once transcoding completes, the video is available for adaptive streaming in experiments
Security Benefits:
- Private by Default: Videos are not publicly accessible
- Signed URLs: Access controlled through time-limited, authenticated URLs
- Permission Controls: Share only with authorized users or groups
- Automatic Expiration: URLs expire after 3 hours, preventing unauthorized access
- No Public Exposure: Videos cannot be accessed outside the platform
HLS Benefits:
- Adaptive Quality: Automatically adjusts to viewer's connection speed
- Faster Start: Near-instant playback with segment-based loading
- Better Sync: Consistent playback across all participants
- Browser Compatible: Universal format support including Firefox
Processing
All uploaded videos are automatically processed:
- Thumbnails generated automatically
- Duration and resolution detected
- Format conversion if needed for compatibility
- Optimization for web playback
Bulk Upload
For multiple files:
- Select multiple files during the upload process
- Apply batch metadata to all files
- Set common permissions and folder location
- Individual files can be edited after the upload completes
File Size Considerations
When uploading media, consider:
- Network Bandwidth: Larger files take longer to upload (multipart upload helps with reliability)
- Storage Limits: Your account may have storage quotas (check Organization settings)
- Upload Limits: Images max 10MB, videos max 10GB
- Participant Experience: HLS adaptive streaming automatically adjusts quality, so large source files don't impact participant experience
- Quality Needs: Higher resolution source files enable better HLS quality levels
Media Organization
Creating Folders
To organize media into folders:
- In the Media Library, click "New Folder"
- Enter a name for the folder
- Select a parent folder (optional)
- Set permission level for the folder
- Click "Create"
Folders can be nested to create a hierarchical structure.
Using Tags
Tags offer flexible categorization:
- Select one or more media items
- Click "Edit" or use the tag field in the info panel
- Enter new tags or select from existing ones
- Tags are searchable and can be used as filters
Example useful tags: "stimuli", "instructions", "faces", "landscape", "high-arousal".
Searching and Filtering
To find specific media:
- Use the search bar to find by filename, description, or tags
- Apply filters to narrow results:
- Type: Image or video
- Date: Recently added, modified date range
- Size: Small, medium, large
- Creator: Who uploaded the media
- Tags: Filter by specific tags
Batch Operations
For managing multiple items:
- Select multiple items by clicking with Shift or Ctrl/Cmd
- Available batch operations:
- Move to folder
- Add/remove tags
- Change permissions
- Delete multiple items
Media Permissions
Media permissions are managed through HyperStudy's unified Permission Manager, the same interface used for experiments, deployments, and data.
Managing Media Permissions
To set permissions for a media item:
- Select the image or video in the Media Library
- Click Permissions in the info panel or context menu
- The Permission Manager opens, showing:
- Owner - Who uploaded the media
- Who Has Access - Current users, groups, and public access
- Grant Access - Add users or groups
- Toggle permission icons (View, Edit, Duplicate, Manage Access) for each entry
Folder Permissions
Folders have their own permission settings:
- Folder permissions can be set during creation or edited later
- All items in a folder inherit its permissions by default
- Individual items can override folder permissions
- Moving items between folders updates their permissions
For more details on the permission system, see the Permissions & Sharing guide.
Using Media in Experiments
In Image Components
To use images in your experiment:
- Add an Image component to a state
- In the component properties, click "Select Image"
- Browse the media library for your image
- Only images you have permission to access will appear
- Select the image and configure display settings
In Video Components
To use videos in your experiment:
- Add a Video component to a state
- In the component properties, click "Select Video"
- Browse the media library for your video
- Only videos you have permission to access will appear
- Select the video and configure playback settings
Media Library Benefits
All media should be uploaded to the platform library for:
- HLS Streaming: Automatic adaptive bitrate for optimal playback
- Security: Signed URLs with automatic expiration
- Precaching: Faster experiment startup
- Synchronization: Reliable multi-participant sync
- Format Conversion: Automatic transcoding to compatible formats
Media Optimization
Image Optimization
For optimal performance:
- Resize before uploading: Match image dimensions to display size
- Compress appropriately: Use JPG for photos, PNG for graphics with transparency
- Check file size: Keep under 1MB when possible for faster loading
- Use vector formats: SVG is ideal for diagrams and illustrations
Video Optimization
For optimal video performance:
- Use appropriate resolution: 720p or 1080p is sufficient for most experiments
- Compress efficiently: Use H.264 encoding with balanced quality settings
- Consider segmentation: Break long videos into shorter segments if your experiment design allows it
- Upload in recommended format: MP4 with H.264/yuv420p ensures the best source quality for HLS transcoding
Media Precaching for Performance
HyperStudy automatically precaches media to ensure smooth playback and precise timing:
How Precaching Works
- Automatic Detection: The platform identifies all media used in your experiment
- Pre-experiment Loading: Media is loaded before the experiment starts
- Browser Caching: Optimized cache headers ensure fast subsequent access
- Synchronized Loading: All participants preload media before entering states
Benefits
- Eliminates Loading Delays: No waiting for videos to buffer during critical moments
- Improved Synchronization: Preloaded videos start playing immediately across all participants
- Consistent Timing: Removes variability caused by network-dependent loading
- Better Performance: Reduces bandwidth usage during active experiment phases
What Gets Precached
- Videos: All videos used in Video components (HLS segments and playlists)
- Images: All images used in Image components
Best Practices
- Keep Media Reasonable: Very large files (over 500MB) may take time to precache
- Test Precaching: Check the console logs during testing to verify precaching completion
- Wait for HLS: Ensure video transcoding is complete before running experiments with that video
Monitoring Precaching
During experiment initialization, you can monitor precaching progress:
- Check browser console for "Media preload complete" messages
- Loading screens display precaching status
- The experiment won't start until essential media is preloaded
Note: Precaching is automatic and requires no configuration. The system intelligently determines which media to precache based on your experiment design.
Collaboration Through Media Sharing
Sharing with Colleagues
To collaborate using shared media:
- Organize related media in dedicated folders
- Set appropriate group permissions
- Tag media with project-specific tags
- Notify colleagues when new media is available
Best Practices for Shared Media
When working with shared media:
- Consistent Naming: Use clear, descriptive filenames
- Complete Metadata: Add thorough descriptions and tags
- Version Control: Include version information in filenames
- Attribution: Note the source or creator in the description
- Usage Notes: Add information about intended purpose
Media Analytics
The platform provides insights into media usage:
- Usage Tracking: See which experiments use each media item
- View Counts: Track how often media is accessed
- Performance Metrics: Monitor loading times and playback issues
- Storage Utilization: Track how much of your quota is used
Access analytics in the Media Library by selecting an item and viewing its info panel.
Advanced Features
HLS Streaming Architecture
The platform automatically provides adaptive streaming for all uploaded videos:
-
Automatic HLS Generation:
- Videos transcoded to multiple quality levels (360p-1080p)
- Master playlist (.m3u8) with quality variants
- 6-second segments for smooth seeking
-
Delivery via CloudFront CDN:
- Global edge caching for fast delivery
- Signed URLs for security
- Optimized cache headers
-
Intelligent Playback:
- HLS.js for cross-browser support
- Native HLS on Safari
- Automatic quality switching based on bandwidth
Media Synchronization
For experiments requiring precise timing:
- Frame-Accurate Sync: Videos synchronized across all participants
- Preloading: Media cached before experiment start
- Bandwidth Adaptation: HLS quality adjusts based on connection automatically
Monitoring Usage
To check your current storage usage:
- Go to your Profile Settings
- Select the "Storage" tab
- View current usage, quota, and item breakdown
- Get notifications when approaching quota limits
Managing Storage
If approaching storage limits:
- Archive Unused Items: Move to long-term storage
- Optimize File Sizes: Reduce unnecessarily large files
- Remove Duplicates: Delete redundant media
- Request Quota Increase: Contact administrators if needed
Troubleshooting
Common Upload Issues
| Issue | Potential Solutions |
|---|---|
| Upload fails | Check file size and format; ensure stable internet connection |
| Processing stuck | For videos, check format compatibility; try re-uploading |
| Permissions error | Verify you have upload rights; check quota availability |
| File too large | Compress or resize the file; split large videos |
Playback Problems
| Issue | Potential Solutions |
|---|---|
| Video won't play | Check format compatibility; verify processing completed |
| Poor playback quality | Check internet connection; lower video resolution |
| Image display issues | Verify format support; check image dimensions |
HLS Transcoding Issues
If a video's HLS status shows Failed or remains Pending for an extended time:
| Status | What It Means | What To Do |
|---|---|---|
| ⏳ Pending (over 15 min) | Transcoding queue backlog | Wait, or use the retry button |
| ✗ Failed | Transcoding encountered an error | Hover to see error, then retry |
| 🔄 Processing (over 45 min for short video) | Unexpected delay | Wait or contact support |
Expected processing times:
- Videos under 30 min: 2-5 minutes
- Videos 30-90 min: 5-15 minutes
- Videos over 90 min: 15-45 minutes
To retry transcoding:
- Go to Admin → Videos
- Find the video with the issue
- Hover over the HLS status to see error details (if any)
- Click the retry button (circular arrow icon) next to the status
- The status will change to "Pending" and transcoding will restart
Common error messages:
| Error | Meaning | Solution |
|---|---|---|
| "Video file not found" | Original file is missing from storage | Re-upload the video |
| "Video format not supported" | Codec not recognized by MediaConvert | Convert to MP4 (H.264) |
| "Transcoding job failed" | MediaConvert processing error | Try retry; if persistent, re-encode source |
| "Access denied" | Storage permission issue | Contact support |
Next Steps
Now that you understand media management, explore these related topics:
- Image Component Configuration
- Video Component Configuration
- Permissions & Sharing - Managing media access controls
- Collaborating Through Groups