Deployments
Deployments are how you collect data with your experiments. A deployment is an independent data collection instance that links to an experiment design, allowing you to run the same experiment multiple times for different cohorts, sites, or time periods while keeping data organized and ownership clear.
Why Deployments?
In earlier versions of HyperStudy, recruitment and data collection were tied directly to an experiment. Deployments decouple these concerns:
- Same experiment, multiple runs: Deploy the same experiment design to different participant groups without duplicating the experiment itself
- Clear data ownership: The deployment owner owns all data collected through that deployment
- Independent tracking: Each deployment has its own session monitoring, participant tracking, and status
- Flexible recruitment: Configure different recruitment methods (Public, Private, Prolific) per deployment
Think of an experiment as a blueprint and a deployment as a run. You design the experiment once, then create deployments each time you want to collect data.
Creating a Deployment
To create a new deployment:
- Navigate to the Deployments page from the main navigation
- Click Create Deployment
- Select the experiment you want to deploy
- Configure deployment settings:
- Deployment Name: A descriptive name for this data collection run (e.g., "Spring 2026 Cohort" or "Site A - Phase 1")
- Target Participant Count: How many participants you aim to collect
- Recruitment Method: Public, Private, or Prolific (see Recruitment Settings)
- Click Create
Your deployment is created in Active status and is ready to accept participants.
Deployment Lifecycle
Deployments follow a clear lifecycle:
Active → Paused → Completed → Archived
| Status | Meaning |
|---|---|
| Active | Accepting participants; sessions can be created |
| Paused | Temporarily stopped; no new participants; existing sessions continue |
| Completed | Target reached or manually completed; no new sessions |
| Archived | Stored for reference; data preserved but deployment is inactive |
Changing Status
- Pause: Click the pause button on an active deployment to temporarily halt recruitment while existing sessions finish
- Resume: Click resume on a paused deployment to reactivate it
- Complete: Mark a deployment as completed when you have enough data or want to stop collection
- Archive: Move completed deployments to the archive for long-term storage
Scheduling
Deployments support optional scheduling:
- Start Date: Deployment activates automatically at the specified date and time
- End Date: Deployment completes automatically when the end date is reached
- Auto-Completion: Deployment completes when the target participant count is reached
Deployment Dashboard
The deployments page provides two views for managing your deployments:
Active Deployment Cards
At the top of the page, active deployments are displayed as cards showing at-a-glance information:
- Deployment name and linked experiment
- Live session count: How many sessions are currently running
- Participant progress: Current count vs. target
- Status badge: Current lifecycle status
- Quick actions: Pause, complete, or expand for details
Cards can be reordered by dragging them to match your preferred priority.
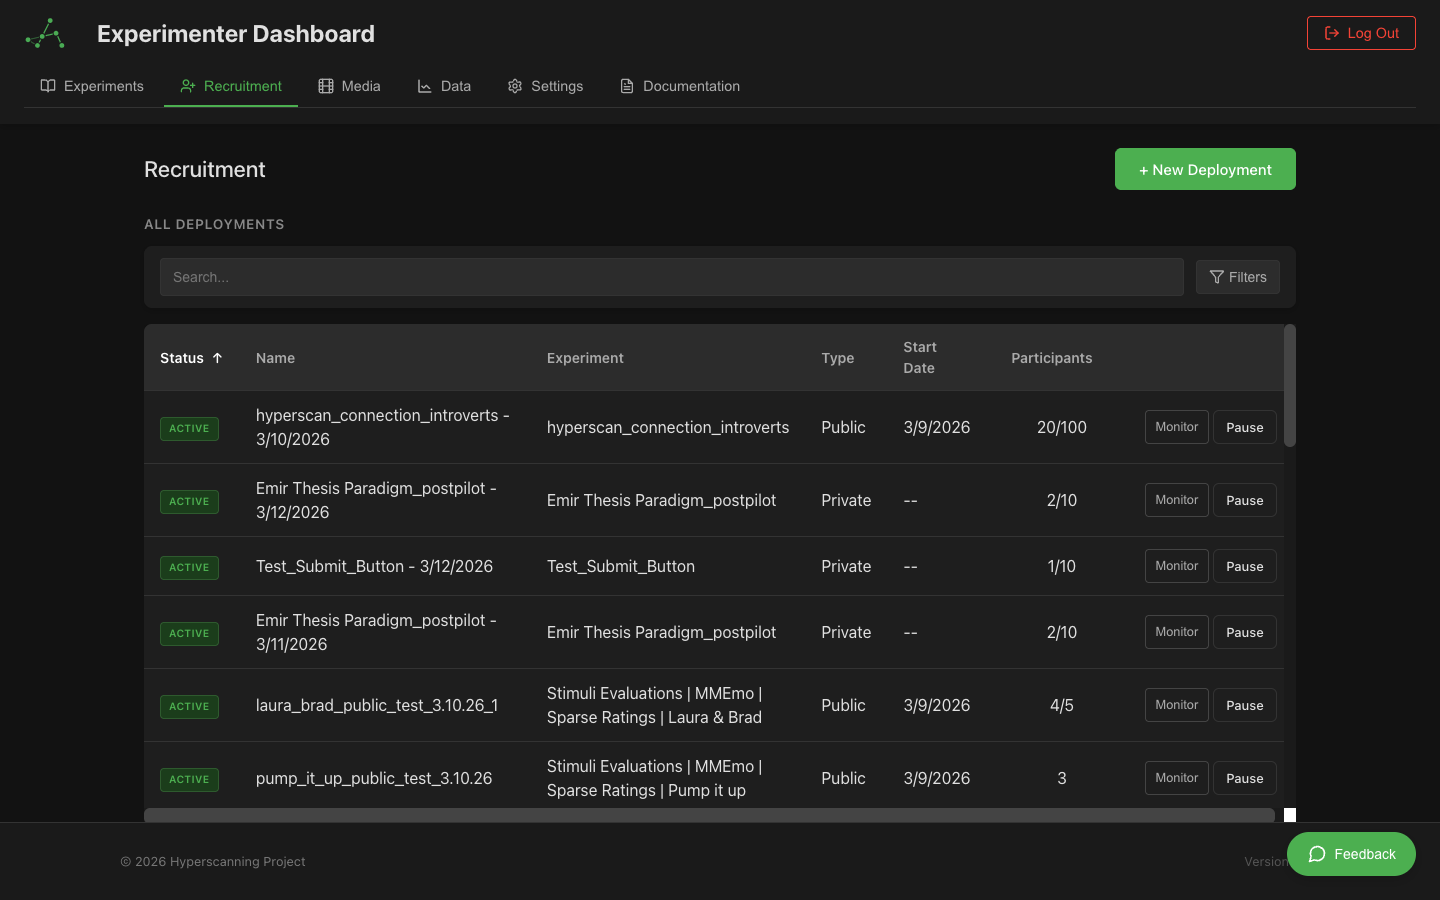
Deployment Table
Below the cards, the full deployment table lists all deployments (active, paused, completed, and archived) with sortable columns:
| Column | Description |
|---|---|
| Name | Deployment name with status badge |
| Experiment | Linked experiment name |
| Status | Current lifecycle status |
| Sessions | Total session count |
| Participants | Completed participant count vs. target |
| Created | When the deployment was created |
| Your Access | Your permission level for this deployment's data |
Use the search bar to filter by deployment or experiment name, and click column headers to sort.
Session Tracking
Each deployment includes inline session tracking. Click on a deployment card or expand a table row to see real-time session monitoring.
Participant Pipeline
At the top of the tracking view, a pipeline visualization bar shows where all participants currently are in the experiment flow:
Consent → Instructions → Waiting → Matched → In Experiment → Questionnaire → Completed
Each stage displays a real-time count of participants at that point. Stages with active participants are highlighted, making it easy to see at a glance where participants are concentrated. For example, if three people are in the waiting room and two are mid-experiment, the Waiting and In Experiment stages will both be highlighted with their respective counts.
The pipeline updates in real-time — as participants move through the experiment, the counts shift across stages automatically.
Filtering Completed Sessions
Below the pipeline, a toggle button lets you show or hide completed sessions. The button label includes the count of completed sessions (e.g., "Show completed (12)"). By default, completed sessions are hidden to keep the table focused on active sessions that may need attention.
Session Table
The session tracking view shows all sessions for that deployment:
| Column | Description |
|---|---|
| Status | Session state badge (Active, Waiting, Stuck, Completed, Abandoned) |
| Room ID | Unique session identifier |
| Participants | Colored pills showing each participant with role and connection status |
| Current State | Which experiment state participants are in (e.g., "Intro (1/5)") |
| Component | Type of component currently displayed |
| Time in State | How long participants have been in the current state |
| Alert | Stuck indicator badge and/or participant message count badge (see Messaging) |
| Actions | Context-sensitive controls: Advance, End, Msg, Cancel, or Cleanup depending on session status |
Status Badges
| Badge | Meaning |
|---|---|
| Active | Session is running normally |
| Waiting | Waiting for participants to join or ready up |
| Stuck | Participants have been in the same state for over 10 minutes |
| Completed | Experiment finished successfully |
| Abandoned | Session ended or all participants disconnected |
Session Controls
The Actions column shows different controls depending on the session's status:
Active Sessions
- Advance: Move all participants to the next experiment state. Use when a participant is stuck or you need to skip a state during testing.
- End: Terminate the session and show participants the completion screen. This action cannot be undone.
- Msg: Open a compose modal to send a message to all participants in this room. See Experimenter-Participant Messaging for details.
If participants have sent help messages, a View msgs button also appears, opening the message thread for that room.
Pre-Experiment Sessions (Consent, Instructions, Waiting)
- Cancel: Remove the participant from the waiting pipeline. A confirmation dialog appears. Use this when a participant appears to have abandoned the consent or instruction flow and you want to free up their slot.
Stale / Orphaned Sessions
- Cleanup: Mark the session as abandoned in the database. A confirmation dialog appears. Use this for sessions that are stuck (inactive for over 10 minutes) where the participant has likely disconnected or left. This cleans up the session without affecting other active sessions.
Identifying Issues
Stuck sessions are automatically flagged when participants remain in the same state for over 10 minutes. This may indicate:
- A participant stepped away
- Technical difficulties
- Confusion about what to do
- A bug in the experiment design
Actions to take:
- Check if the current component requires specific input
- Try the Advance button to move forward
- If the issue persists, End the session
Real-Time Updates
Session tracking updates in real-time via WebSocket connections. If your connection drops:
- The system automatically reconnects
- A brief notification appears during reconnection
- Manual refresh is available as a fallback
Deployment Permissions
Deployments integrate with HyperStudy's unified permission system.
Data Ownership
The deployment creator owns all data collected through that deployment. This is a key principle: the person who creates the deployment owns the resulting data, regardless of who designed the experiment.
This means:
- A lab member can deploy someone else's experiment and own the collected data
- Data access follows deployment ownership, not experiment ownership
- The deployment owner has full View and Export access to their deployment's data
Access Levels
Deployment access is derived from the linked experiment's permissions:
| Permission | What It Grants |
|---|---|
| View | Can see the deployment, its sessions, and basic tracking |
| Edit | Can modify deployment settings (name, target count, scheduling) |
| Manage Access | Can change who has access to the deployment's data |
| Export | Can download data collected through this deployment |
Sharing Deployment Data
To share data from a deployment with collaborators:
- Click the settings gear icon on the deployment
- The Permission Manager opens for that deployment's data
- Add users or groups and configure their View/Export permissions
- See Data Permissions for details
Recruitment Methods
Each deployment uses one of three recruitment methods. Recruitment is configured at the deployment level, not the experiment level.
Public Enrollment
Participants join via a public link that includes the deployment ID:
https://hyperstudy.io/participant?experimentId=X&deploymentId=Y
Share this link on social media, email lists, or research forums to recruit participants.
Private Enrollment
Invite specific participants through the deployment's recruitment panel:
- Open the deployment
- Go to the Recruitment section
- Select participants or enter email addresses
- Send invitations tied to this specific deployment
Prolific Integration
Create Prolific studies scoped to individual deployments:
- Open the deployment
- Go to the Prolific section
- Configure and publish a Prolific study linked to this deployment
- Prolific participants are automatically routed through the deployment
For detailed configuration of each method, see Recruitment Settings.
Legacy Deployments
Experiments that collected data before the deployment system was introduced appear as legacy deployments in the deployment table. These virtual entries represent historical data collection and:
- Display data from pre-deployment sessions
- Cannot be modified or reconfigured
- Preserve all historical session and participant data
- Are labeled with a "Legacy" badge for clarity
Best Practices
Naming Conventions
Use descriptive deployment names that make it easy to identify data later:
- Include the cohort or time period: "Spring 2026 Cohort"
- Include the site for multi-site studies: "Site A - Boston"
- Include the condition for A/B testing: "Condition 1 - Control"
Target Counts
Set realistic target participant counts:
- Account for expected attrition (incomplete sessions, technical issues)
- Start with a small pilot deployment before scaling up
- Use auto-completion to stop recruitment when targets are met
Monitoring
- Keep the deployment dashboard open during active data collection
- Watch for stuck sessions and intervene when necessary
- Review completed sessions promptly to catch data quality issues
- If you have participant messaging enabled, monitor the Alert column for incoming help requests and respond promptly
- Use the participant pipeline bar to spot bottlenecks (e.g., many participants stuck in Waiting may indicate a matching issue)
Data Organization
- Create separate deployments for distinct data collection periods
- Use deployment names that future collaborators will understand
- Archive completed deployments to keep the dashboard clean
Next Steps
- Experimenter-Participant Messaging - Send messages to participants and receive help requests
- Recruitment Settings - Configure how participants join your deployments
- Prolific Integration - Set up paid recruitment through Prolific
- Permissions & Sharing - Control access to deployment data
- Data Management - Access and analyze collected data