Trigger Component
The Trigger component enables hardware synchronization for experiments, particularly useful for neuroimaging studies (fMRI, EEG) and psychophysiology research. It can either send triggers to external equipment or wait to receive triggers from external devices like MRI scanners.
Interactive Demo

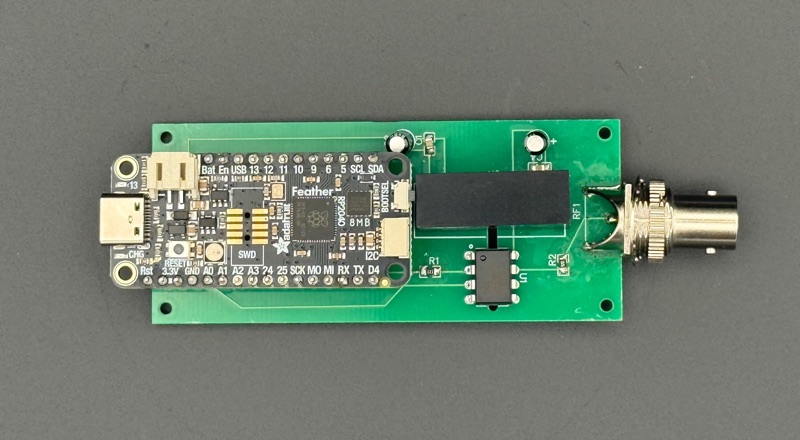
The HyperStudy TTL device delivers electrically isolated sub-millisecond TTL pulses via BNC output, powered by an Adafruit Feather RP2040 with a custom FeatherWing PCB.
Key Features
- Send Mode: Send keyboard or TTL triggers to external equipment
- Receive Mode: Wait for triggers from external devices (e.g., MRI scanner)
- TTL Output on Receive: Send TTL to external equipment when receiving a trigger
- Synchronized Broadcast: Coordinate triggers across multiple participants
- HyperStudy Bridge Integration: USB TTL output via bridge application
When to Use
Use the Trigger component when you need to:
- Synchronize experiment start with MRI scanner
- Send TTL pulses to psychophysiology equipment (EDA, ECG, eye tracker)
- Coordinate experiment timing across multiple participants
- Time-lock multiple pieces of equipment together
Modes of Operation
Send Mode
In send mode, the component sends a trigger when activated:
- Keyboard: Participant presses a key to send trigger
- TTL: Automatically sends TTL pulse via HyperStudy Bridge
Receive Mode
In receive mode, the component waits for an external trigger:
- Listens for a specific keyboard key (e.g., '5' from MRI scanner)
- Optionally sends TTL to external equipment when trigger is received
- Can coordinate with other participants via synchronized broadcast
Configuration
Basic Settings
| Setting | Description | Default |
|---|---|---|
| Mode | send or receive | send |
| Trigger Type | keyboard or ttl (send mode only) | keyboard |
| Trigger Key | Key to send (send mode, keyboard) | t |
| Expected Key | Key to wait for (receive mode) | 5 |
| Show Instructions | Display instructions to participant | true |
| Instructions | Custom instruction text | (auto-generated) |
TTL Output on Receive
| Setting | Description | Default |
|---|---|---|
| Send TTL on Receive | Send TTL pulse when trigger is received | false |
When enabled, receiving a trigger (e.g., '5' from MRI scanner) will automatically send a TTL pulse via the HyperStudy Bridge. This is useful for time-locking external psychophysiology equipment with the scanner trigger.
Synchronized Broadcast (Multi-participant)
| Setting | Description | Default |
|---|---|---|
| Enable Synchronized Broadcast | Wait for all participants before proceeding | false |
| Broadcast Roles | Which roles to include (empty = all) | [] |
Appearance
| Setting | Description | Default |
|---|---|---|
| Background Color | Component background | #1c1c1c |
| Text Color | Text color | #ffffff |
Use Cases
fMRI Experiment Start
Wait for scanner trigger to start experiment:
Mode: receive
Expected Key: 5
Instructions: "Waiting for scanner..."
fMRI with Psychophysiology Time-locking
Wait for scanner and simultaneously trigger external equipment:
Mode: receive
Expected Key: 5
Send TTL on Receive: true
Instructions: "Waiting for scanner..."
When the scanner sends '5', the component will:
- Log the received trigger
- Send TTL pulse to external equipment via HyperStudy Bridge
- Complete and advance to next state
Multi-participant Synchronization
Coordinate experiment start across participants:
Mode: receive
Expected Key: 5
Enable Synchronized Broadcast: true
Broadcast Roles: [] (all roles)
All participants must receive their scanner trigger before any proceed.
Manual TTL Send
Send TTL pulse on participant action:
Mode: send
Trigger Type: ttl
Instructions: "Preparing to send trigger..."
Hardware Requirements
For TTL Output
- HyperStudy Bridge: Desktop application for USB communication
- TTL Device: RP2040-based device (e.g., Adafruit) connected via USB
- Connection: TTL device connected to external equipment
For Scanner Input
- Scanner Interface: Current Designs 932 or similar fORP device
- Configuration: Interface set to output '5' key on trigger
- Connection: Interface connected to participant computer via USB
Data Collection
Events Recorded
| Event | Description |
|---|---|
trigger (sent) | Trigger was sent (keyboard or TTL) |
trigger (received) | Trigger was received from external device |
trigger (sent, TTL on receive) | TTL sent in response to received trigger |
Example Event Data
{
  "eventType": "trigger",
  "category": "component",
  "componentId": "scanner-trigger",
  "data": {
    "action": "received",
    "triggerType": "keyboard",
    "triggerValue": "5"
  },
  "metadata": {
    "participantId": "participant-123",
    "roomId": "room-456",
    "stateId": "wait-for-scanner"
  },
  "timestamp": "2024-01-15T10:30:00.000Z"
}
Integration with Scanner Pulse Recorder
For fMRI experiments, use the Trigger component together with the Scanner Pulse Recorder:
- TriggerComponent (focus component): Waits for initial scanner trigger
- Scanner Pulse Recorder (global component): Counts all TR pulses
This combination provides:
- Synchronized experiment start
- Pre-trigger pulse count (scanner warm-up time)
- Post-trigger pulse tracking (for brain data alignment)
Troubleshooting
| Issue | Solution |
|---|---|
| Trigger not detected | Verify expected key matches interface output |
| TTL not sending | Check HyperStudy Bridge connection and device |
| Synchronized broadcast timeout | Ensure all participants' scanners are ready |
| Bridge disconnected error | Restart HyperStudy Bridge application |
Best Practices
- Test before scanning: Verify trigger detection with your specific hardware
- Use receive mode for fMRI: Let the scanner control experiment timing
- Enable TTL on receive: Time-lock all equipment with a single trigger
- Combine with Scanner Pulse Recorder: Track all TR pulses for data alignment
- Clear instructions: Help participants understand what's happening
Related Components
- Scanner Pulse Recorder - Continuous TR pulse recording
- Video Component - Synchronized stimulus presentation