Review and annotate
The Annotator page is where you check what the models found, correct it, and add annotations of your own. It opens on the video you last had open.
The page has the video at the top left, the timeline under it, and a panel on the right with three tabs: Inspect, Review and People.
Videos and bundles
A run of the pipeline makes a bundle: a folder with a manifest.json and the layers the pipeline made (shots,
transcript, faces and so on), each a JSON file. A bundle never holds the video itself. It names the video by a
fingerprint (its SHA-256), and the app remembers where the video is on your computer.
Runs from Extract are added to the library on their own. To add a bundle made elsewhere, for example with the command line, choose File > Import… (⌘O), or Import… in the video switcher, and choose the bundle's folder. The app checks every file against the manifest and keeps its own copy. Importing the same bundle again opens the copy it has.
The video switcher is the video's name at the top of the page. It lists every video in the library, and finds one by name when there are more than six. A video marked No video has no video file located yet.
Locate video. If the app does not know where a bundle's video is, or the file has moved, the page says … needs its video. Choose Locate video… and pick the file. The app checks it is the same video, by its fingerprint, and remembers it for every bundle of that video.
Playing
- Play (Space) plays the whole video from the playhead.
- Clip (Shift+Space) plays just what is selected, such as an utterance, a shot or a face track, from its start to its end. Loop (L) repeats it. Loop is on at the start.
- Speed plays at 0.5× to 2×.
- Clicking the video plays or pauses it. Clicking a face or object box on the video selects it.
Overlays chooses what is drawn over the video: Faces, Objects, Skeletons, Hands, Face landmarks and Gaze. Each one that is on has its own colour (one colour, or one per person), opacity and line width. Smooth the drawing smooths the boxes on screen without changing the data. Overlays for layers this video does not have are greyed out.
The timeline
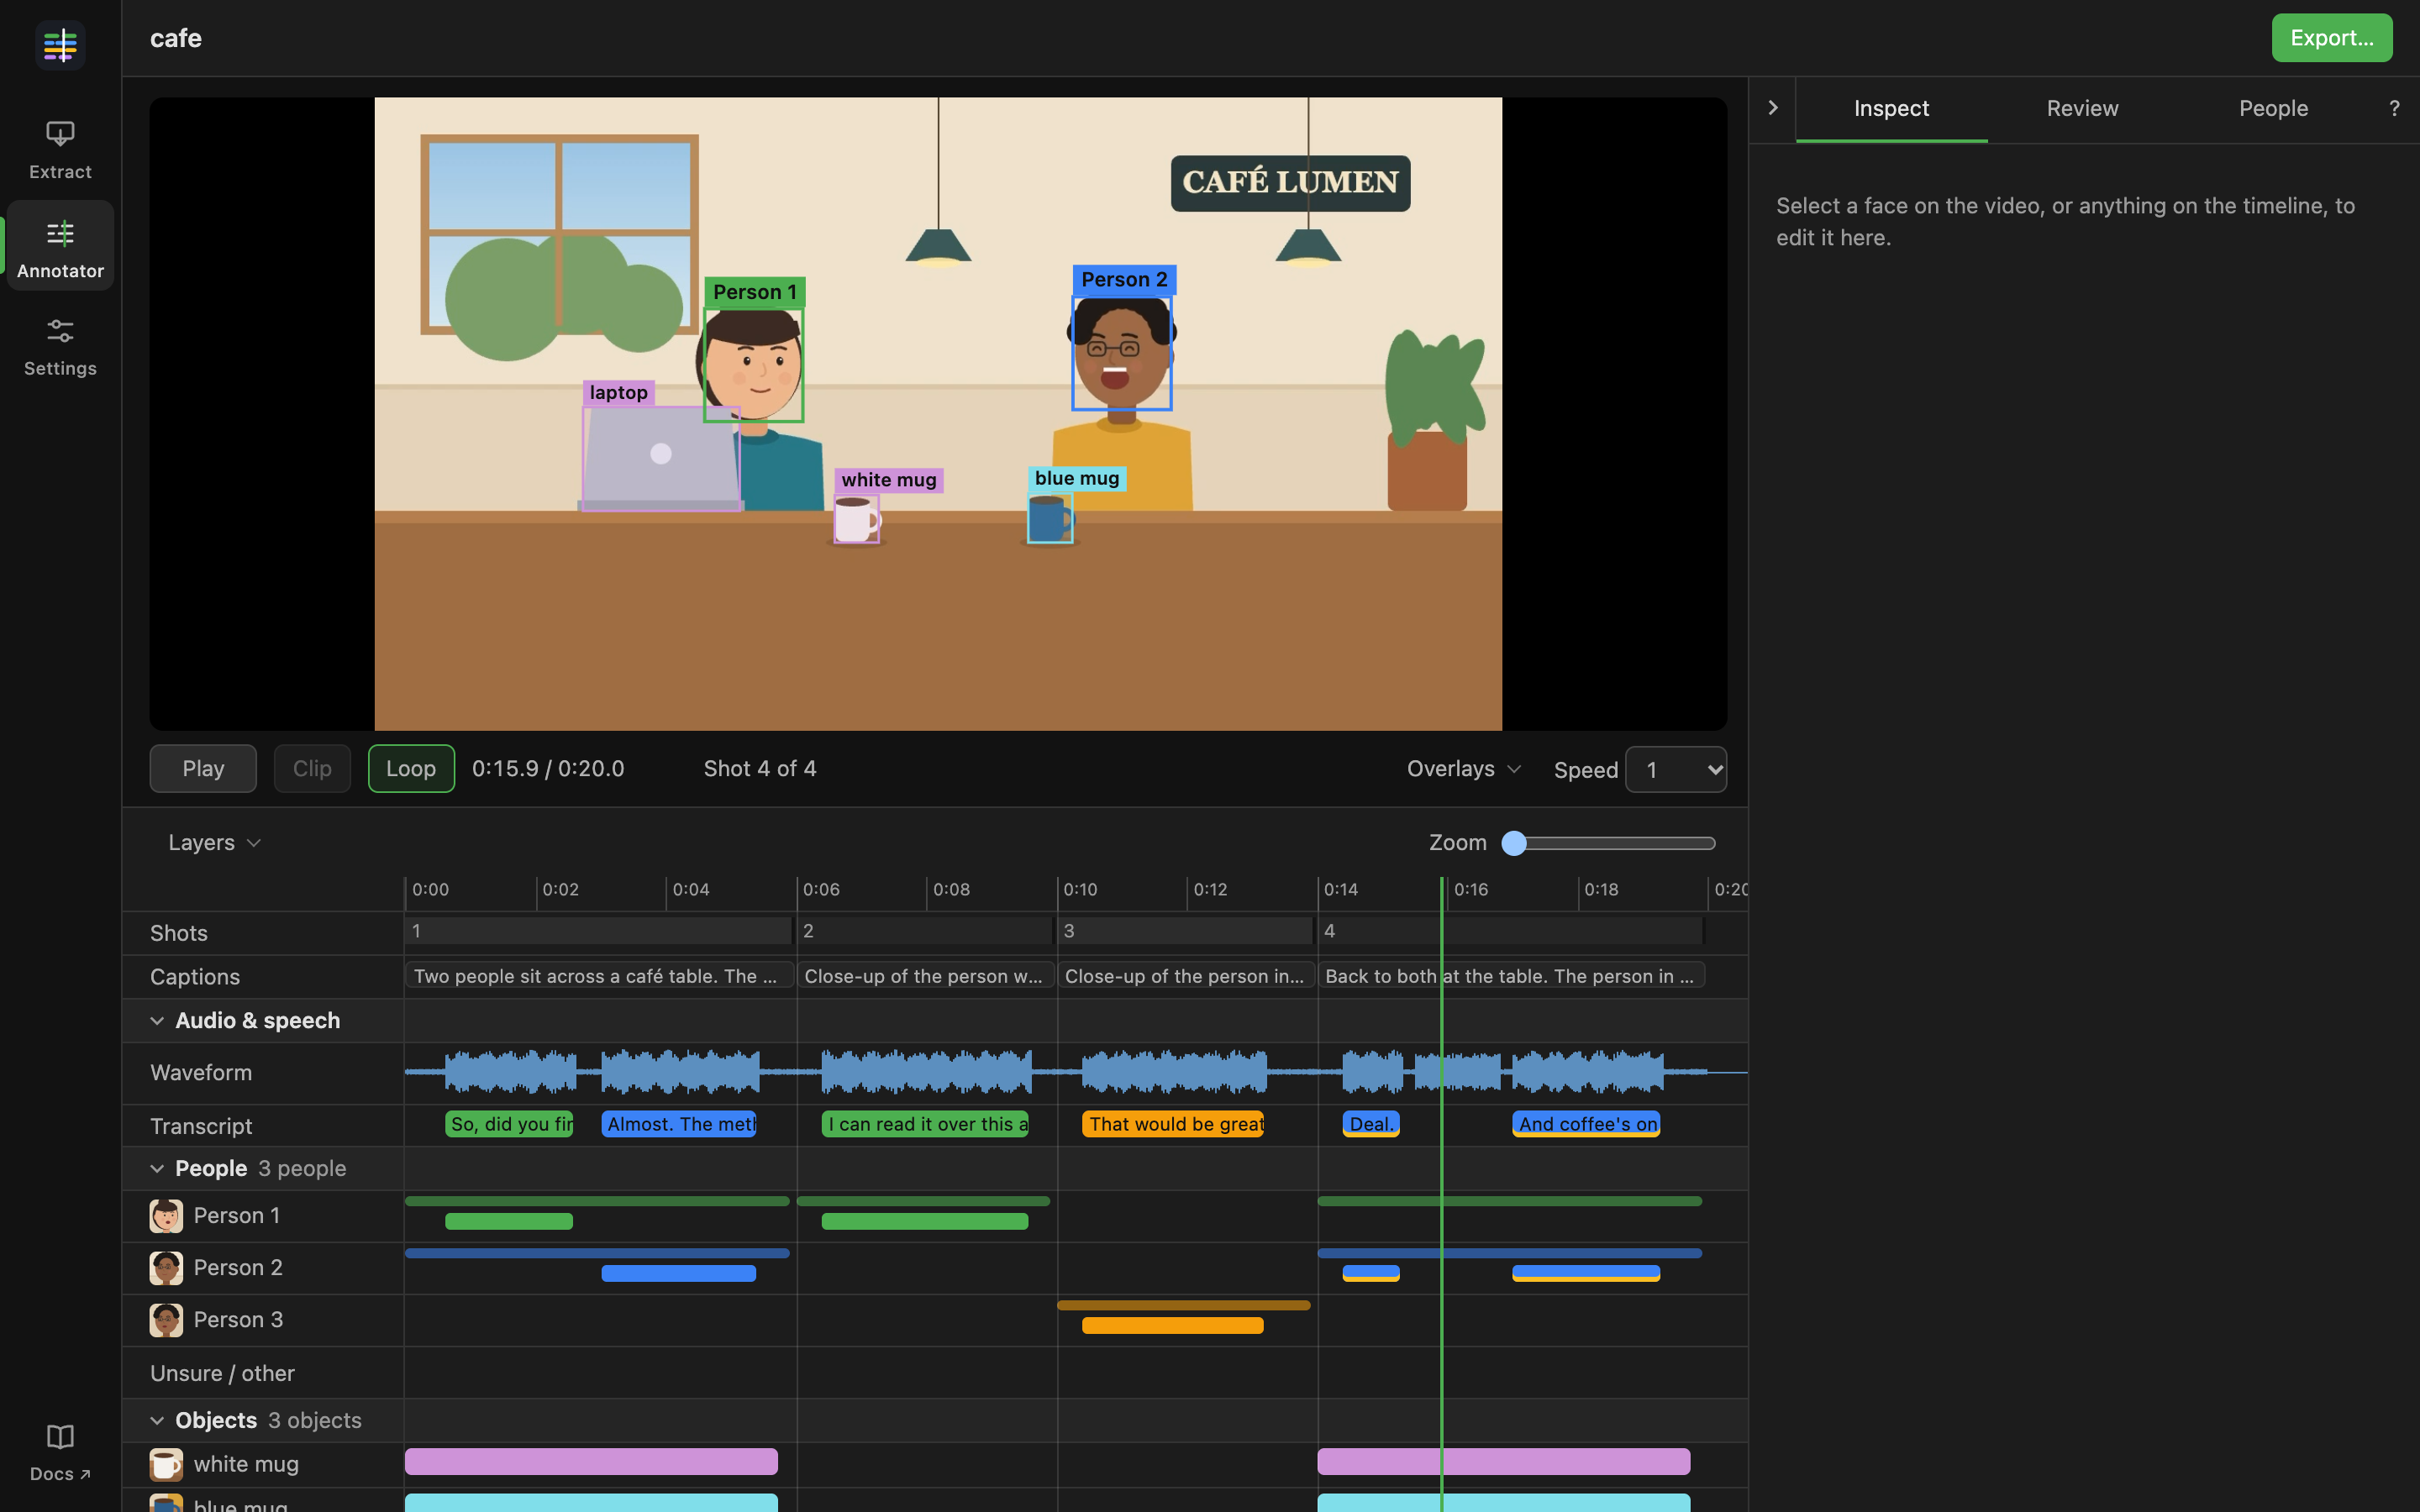
The timeline has a row for shots, one for each shot's caption, and groups of rows below them:
| Group | Rows |
|---|---|
| Audio & speech | the waveform, and the transcript |
| Prosody | pitch, emotion in the voice (arousal and valence), and descriptions of the delivery |
| People | a row per person, with when they are on screen and, thicker, when they speak; a row per off-screen voice; and Unsure / other |
| Objects | a row per object |
| Gestures | hand over mouth, touching face, pointing, raised hand |
| Social | looks at, mutual gaze, joint attention, facing |
| Sounds | sound events such as music or laughter |
| On-screen text | text that appears in the video |
| Annotations | a row for each annotation type you add |
A group or row appears only if the pipeline made that layer for this video.
- Click a bar to select it and play it as a looping clip. Click it again to stop.
- Click empty space to move the playhead. Drag across empty space to loop that stretch. Drag on the ruler to scrub.
- Zoom with the slider, by pinching, or with Ctrl and the scroll wheel.
- Layers turns whole groups on and off. Click a group's name to fold it, and drag its grip to reorder the groups. The ⓘ beside a group lists the models behind it, with their licences.
- Hide a row with its ×, and bring hidden rows back with Show N hidden rows. Drag a row's lower edge to resize it, and the timeline's top edge to give it more room.
How you arrange the rows is remembered for each video. It is not part of your data.
A dashed bar has been left out by an edit. A dashed outline means it is unconfirmed, for example a sound only one model heard. An orange underline means the speaker is uncertain.
Correcting
Select anything, on the video or the timeline, and the Inspect tab shows what is known about it and what you can change. Every change is saved as you make it. ⌘Z (Ctrl+Z on Linux) undoes the last one.
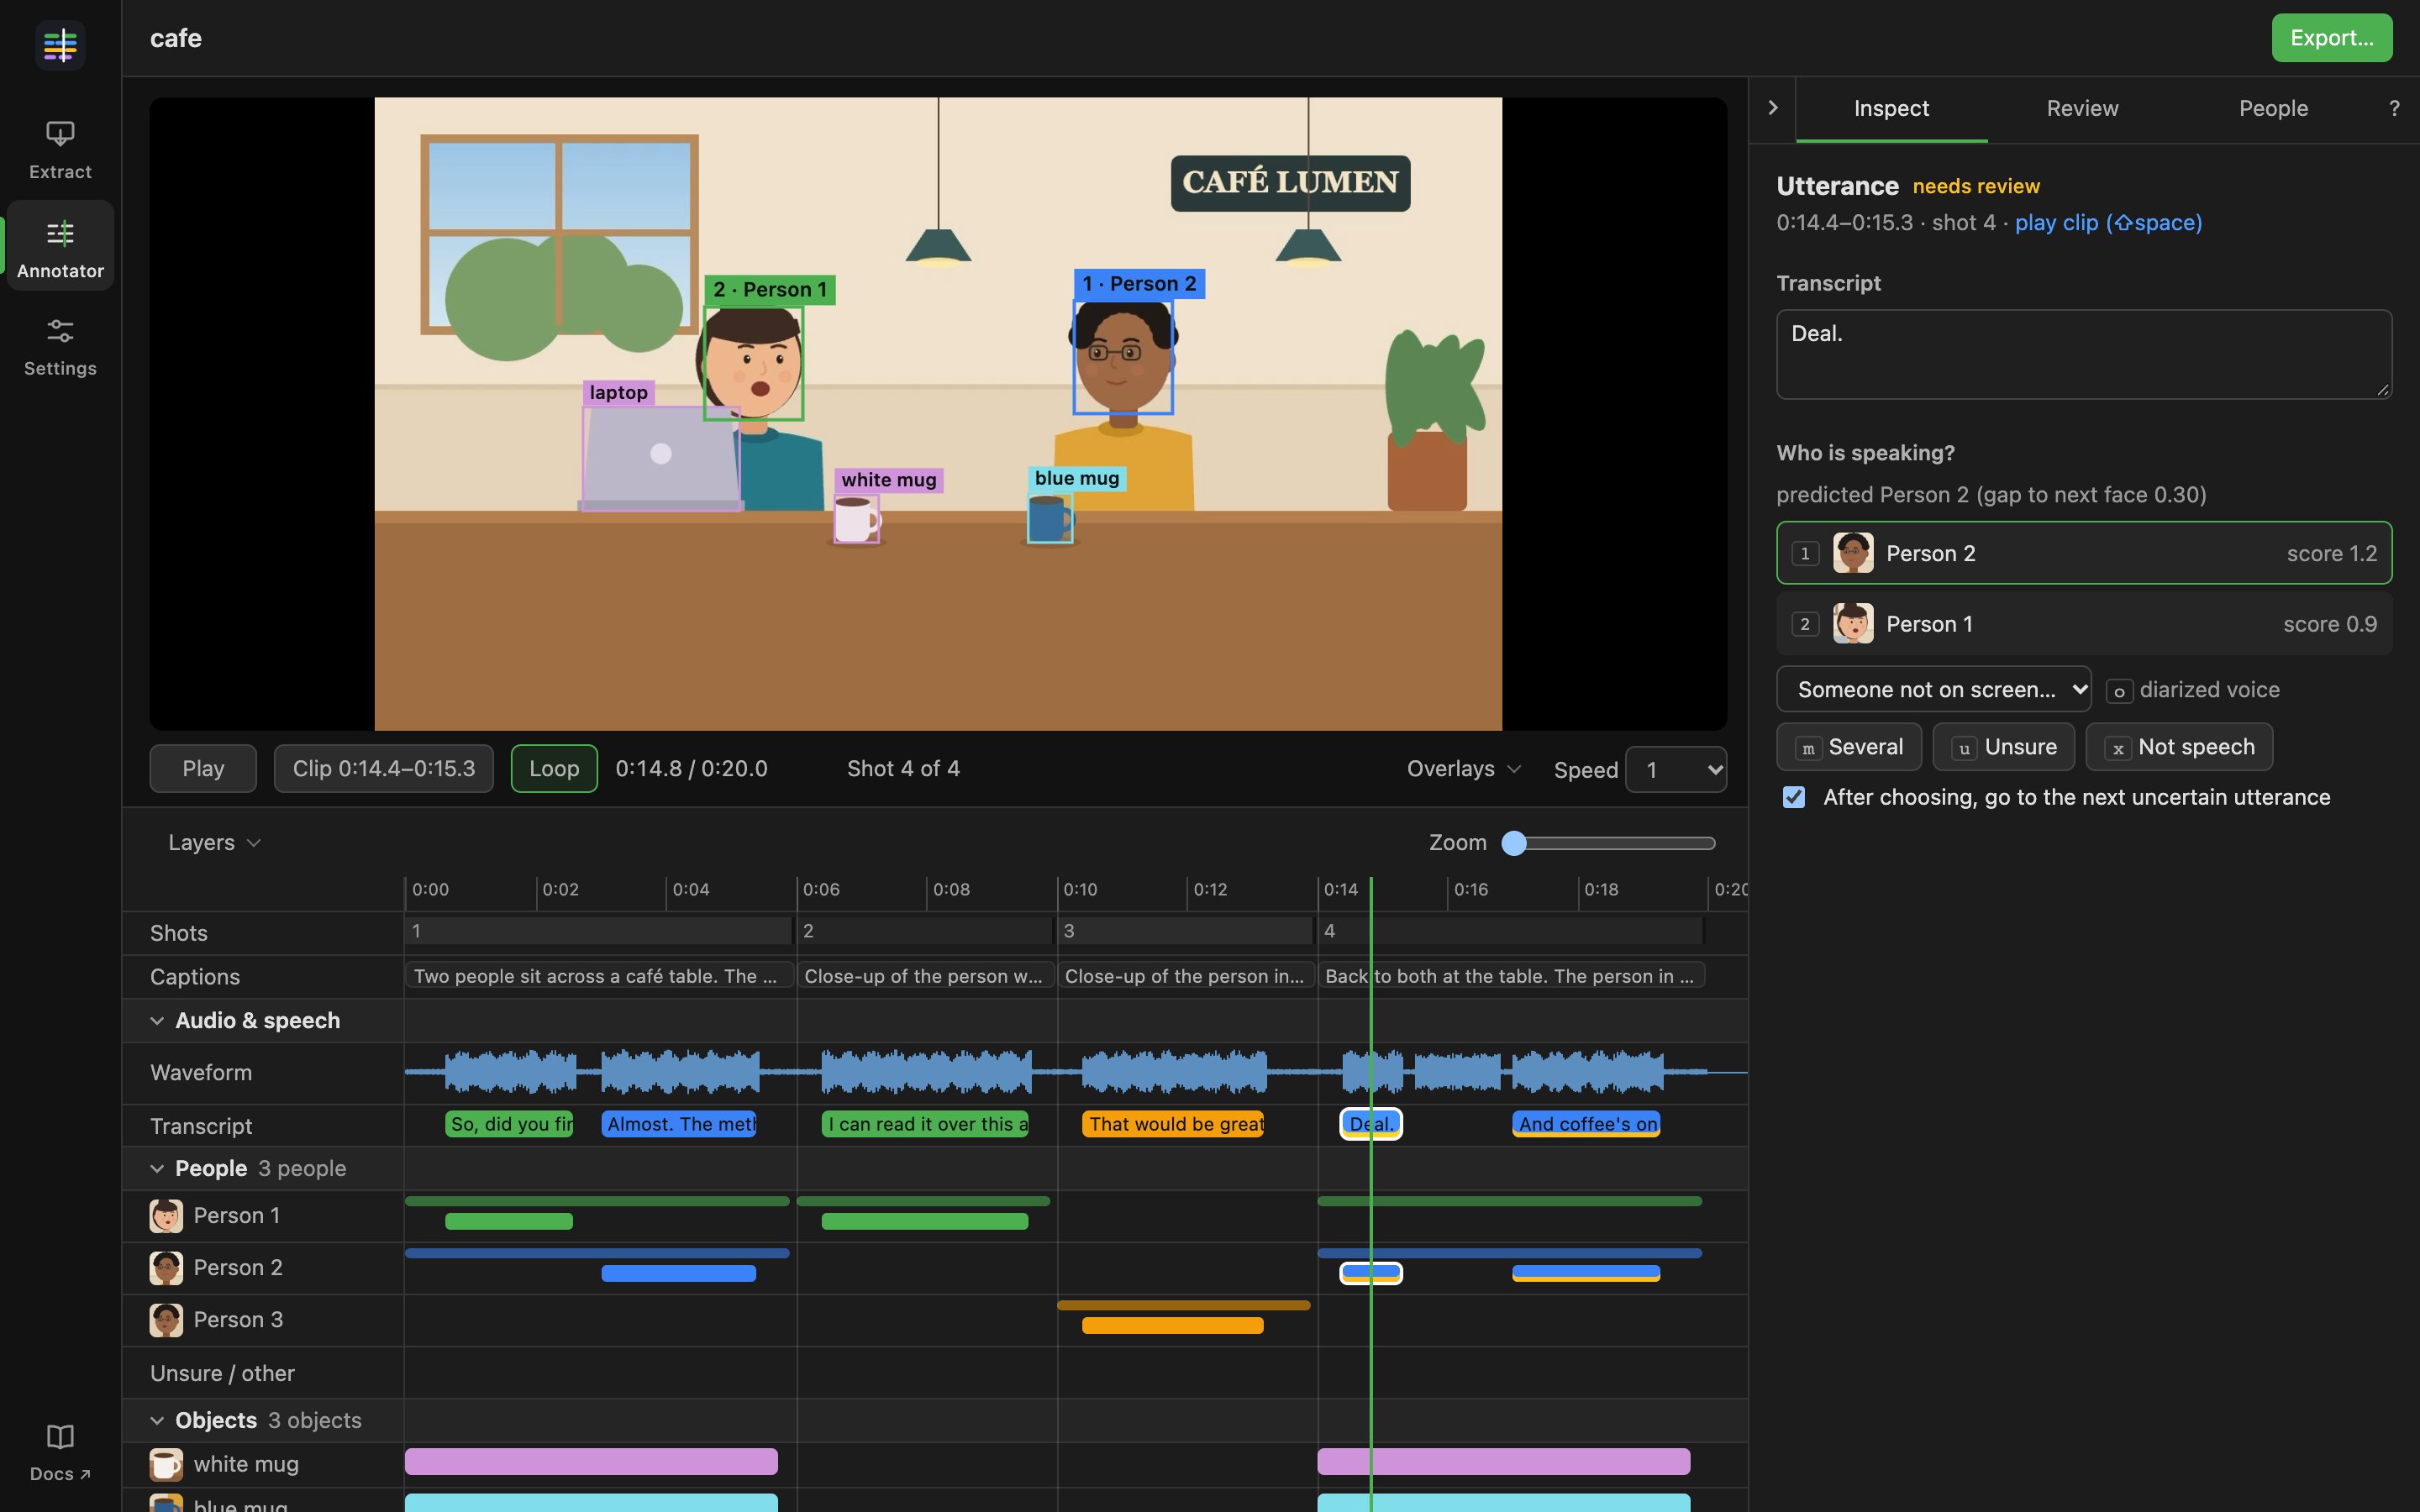
- Shots: edit the caption.
- Utterances: edit the transcript, and say Who is speaking? by choosing one of the faces on screen (each with a score), an off-screen voice, a known person off camera, Several, Unsure or Not speech. You can also drag an utterance's bar onto another person's row. Back to prediction undoes your choice. With After choosing, go to the next uncertain utterance, you can work through a scene without the mouse.
- Face tracks: say Who is this?: one of the people, Unknown, Not a person, or New person…. This changes that one track; Edit … instead changes the person.
- People: double-click a name, here or on the timeline, to rename it. Same person as merges two people found separately. Not a person removes a false face.
- Objects: say which object a track is, or merge two objects with Same object as.
- Sounds: Real or Not there.
Something you have left out shows Put back in Inspect.
The Review tab lists what most needs a person to check:
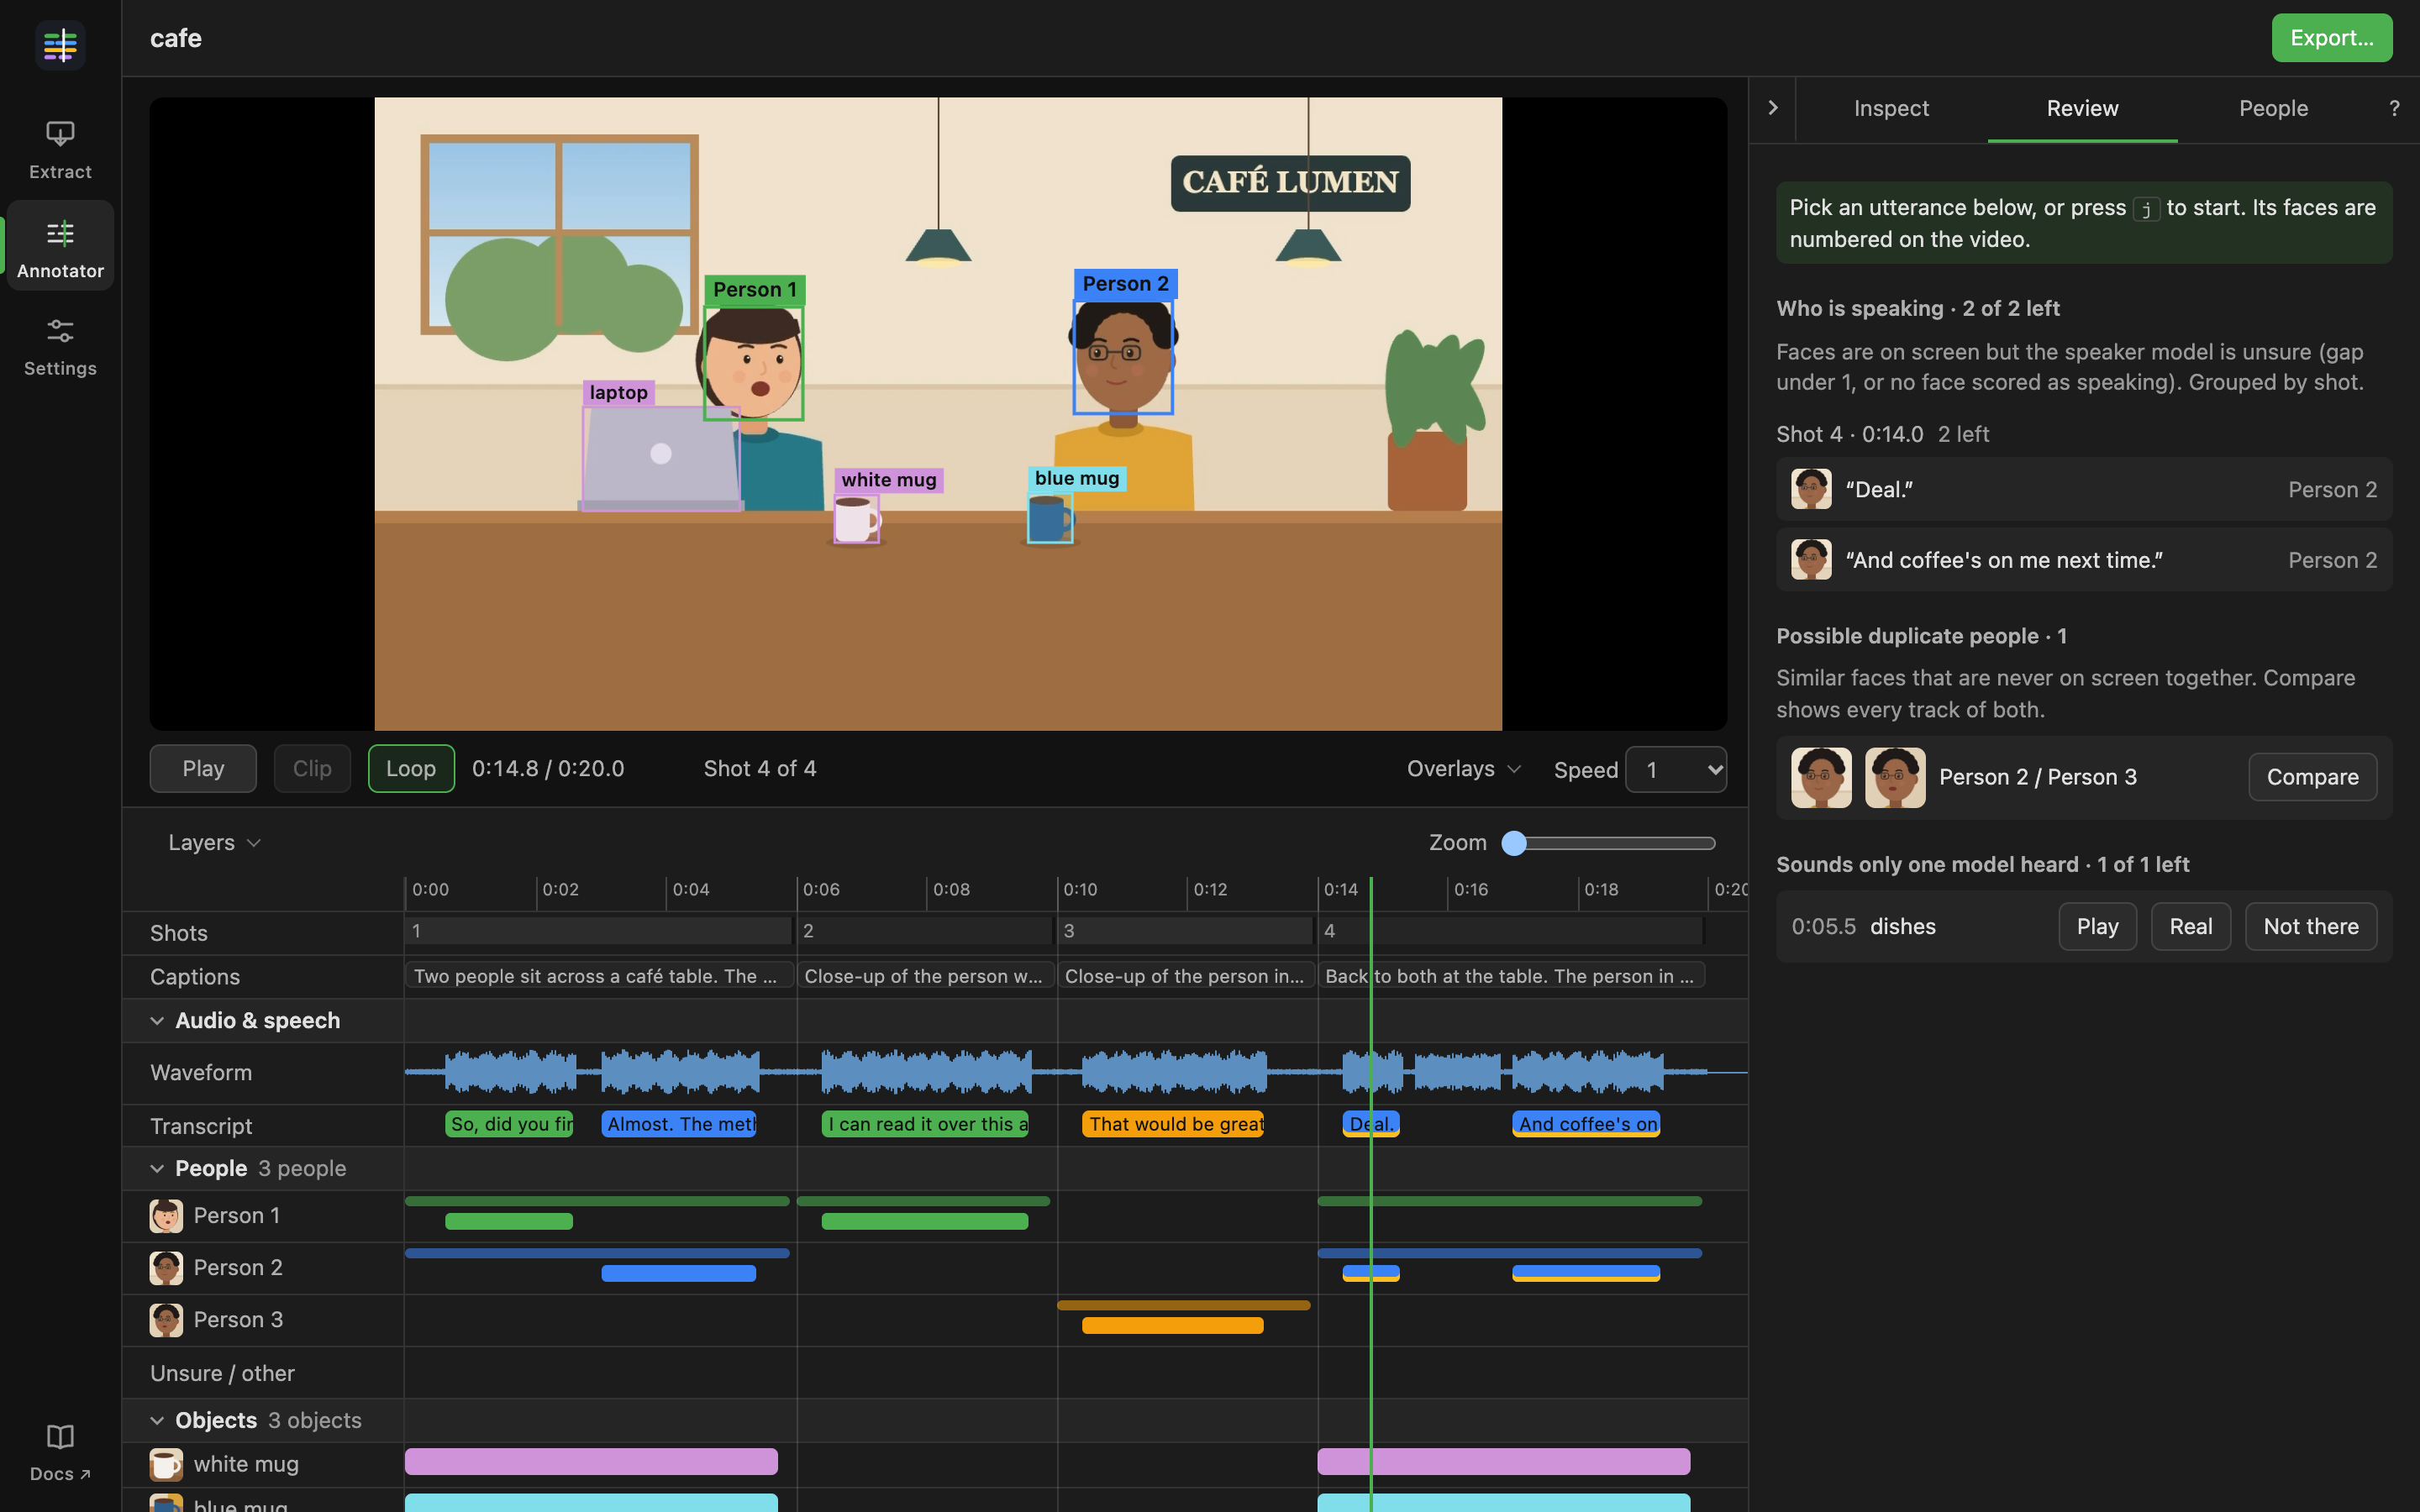
- Who is speaking: utterances whose speaker is uncertain, by shot. Press j to go to the next one and k for the one before.
- Possible duplicate people: pairs that may be one person. Compare shows their faces side by side, to answer Same person or Different people.
- Sounds only one model heard: play each, then Real or Not there.
The People tab lists everyone face clustering found, with how long each is on screen. Click a face to see all of that person's tracks.
Annotating
Annotations are your own coding of the video, such as when someone shows a mental state, or which scenes are tense. Each annotation type is a row of its own under Annotations.
Add a type
Choose + beside Annotations on the timeline, then:
- Name it, for example "Mental state".
- Choose its Value: Yes / no, Category (list the categories), Number (with a range), or Text.
- Say what it is About: a person, or the scene.
Or copy from another video reuses types you made for another video. Click a type's name on its row to edit it. Once annotations use a type, its kind and the categories in use are fixed, and it cannot be deleted.
Annotate
- Drag across a type's row to mark a stretch of time.
- Or press A to annotate what is selected (a shot, utterance or track) or, with nothing selected, the shot under the playhead. You can also press [ at the start and ] at the end while the video plays.
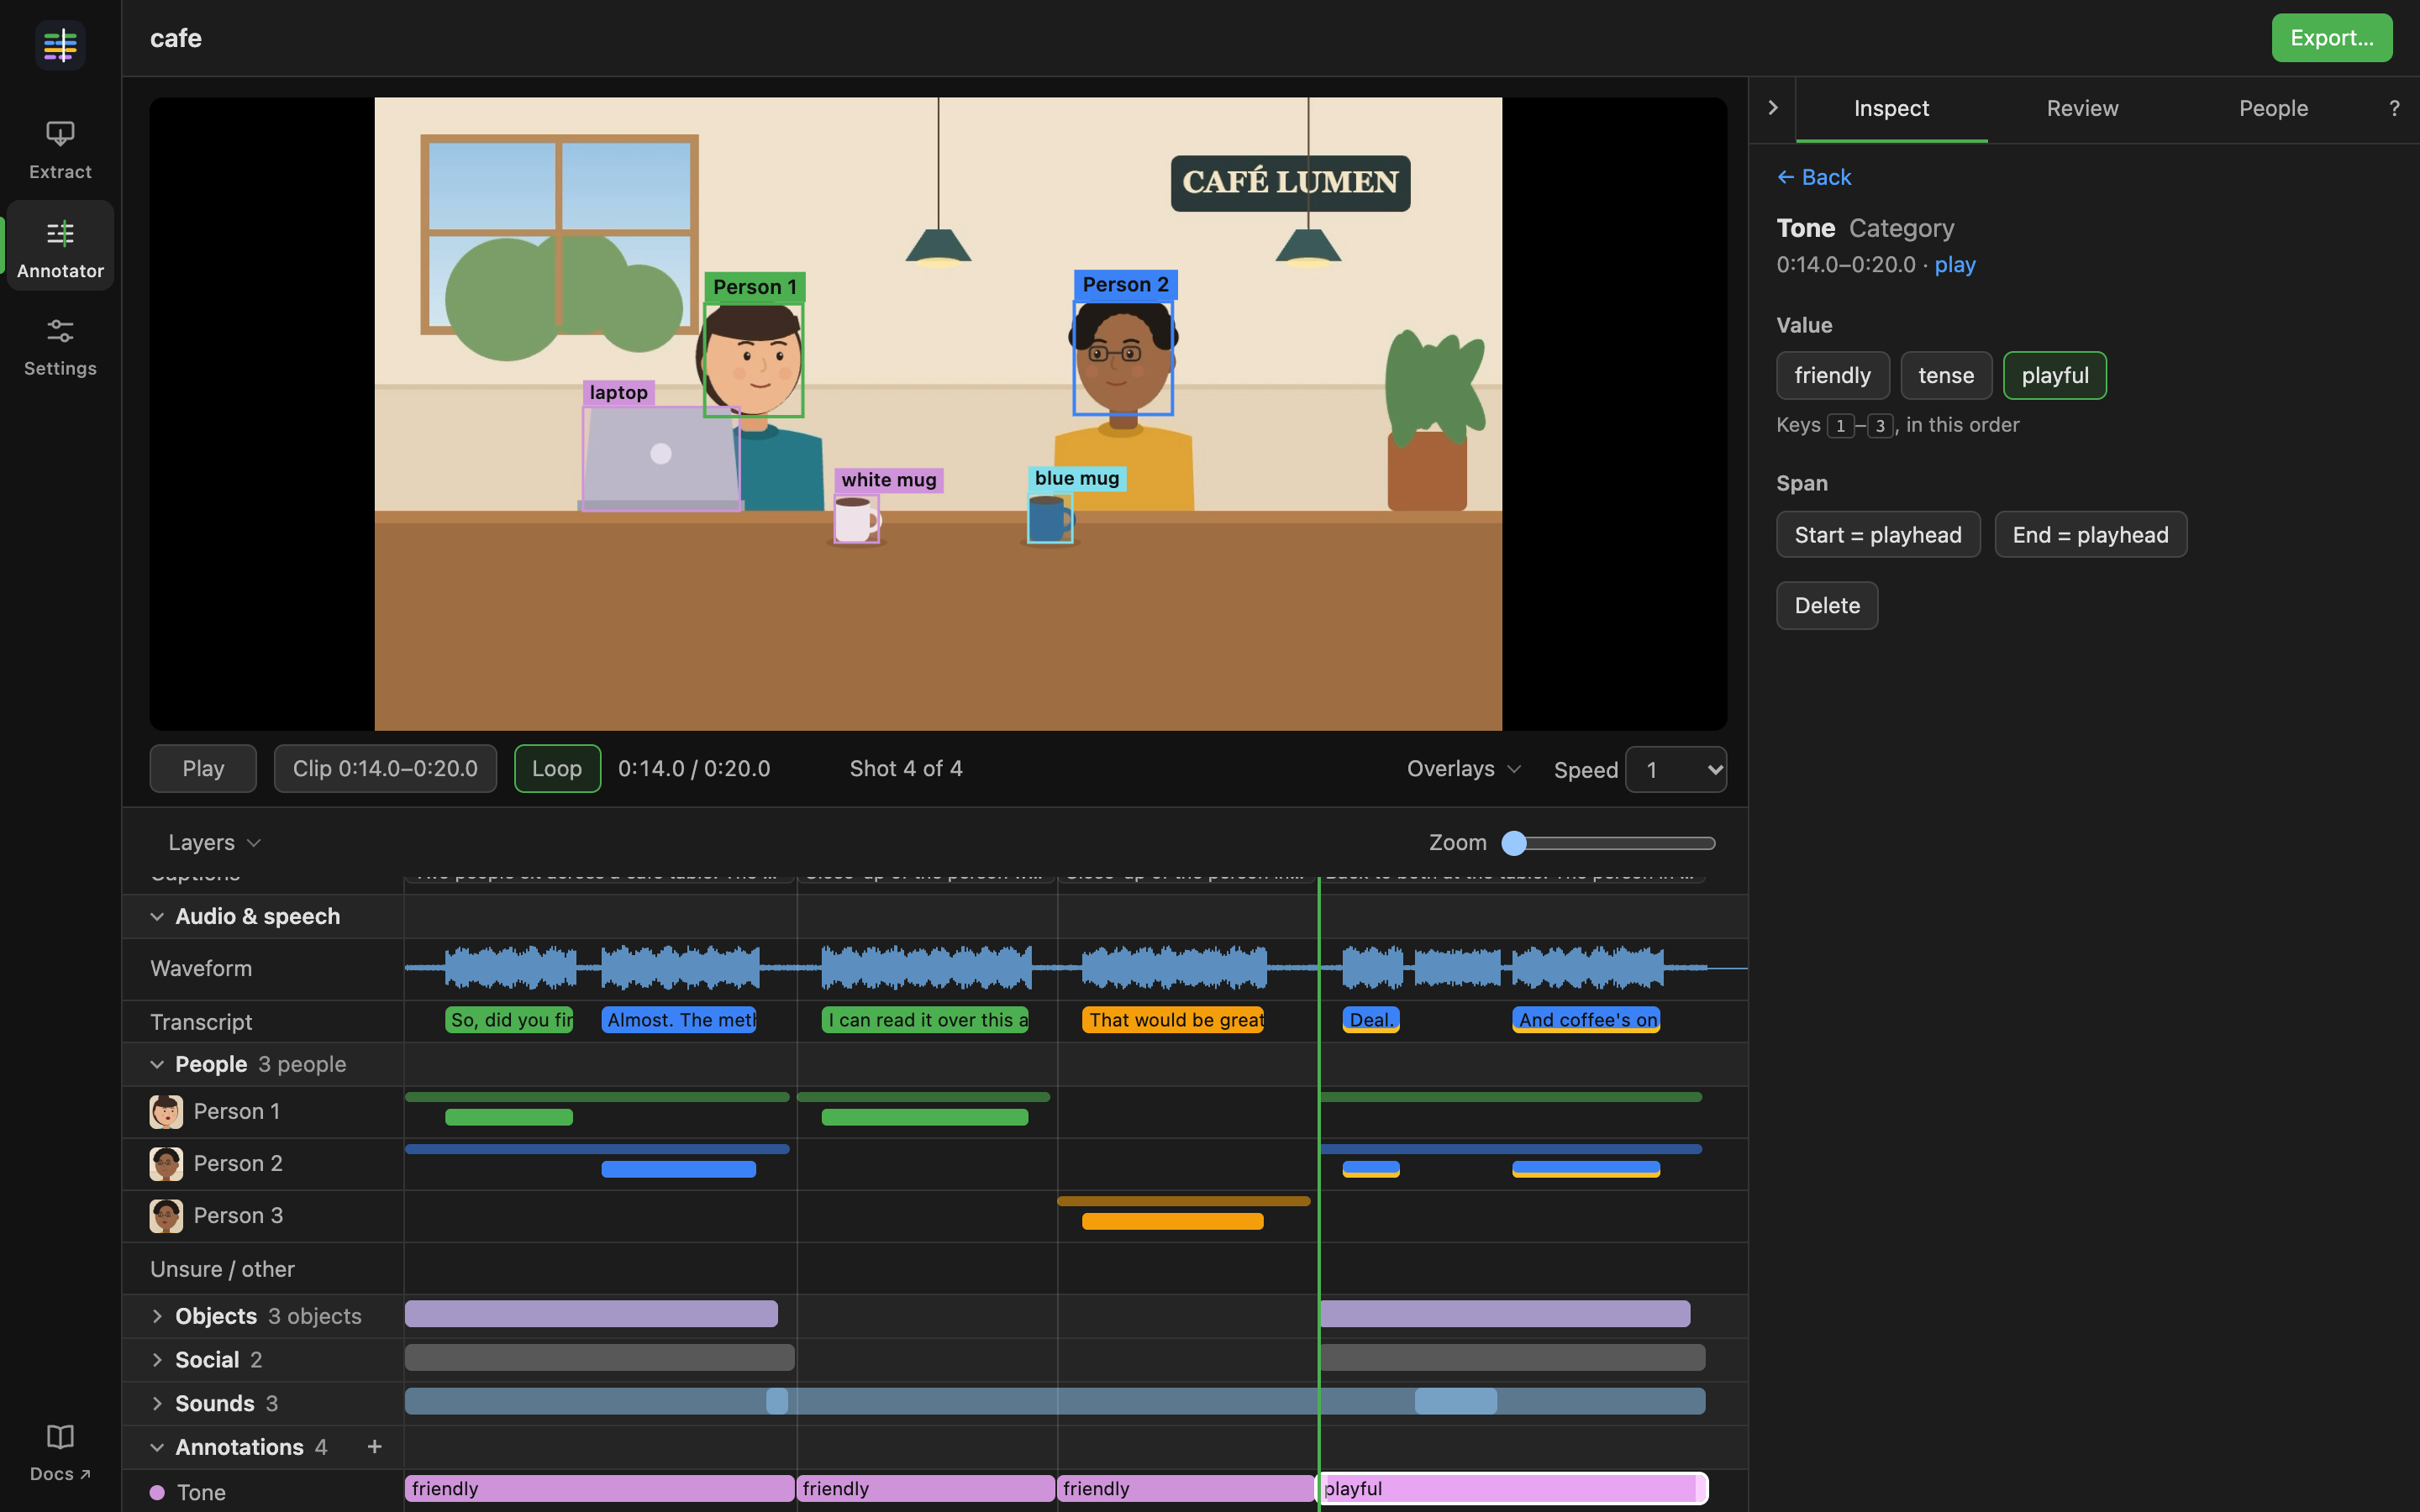
A and [ ] use the type you last added, edited or used: it has a filled dot.
Give the annotation its value: y or n for yes / no, 1 to 9 for categories in the order listed, or in the menu that opens. Double-click an annotation, or press Enter, for its menu. For a type about a person, choose who, from the people on screen first.
Drag an annotation to move it, or drag an end to change its length. Ends snap to shot cuts, the playhead and other annotations; hold ⌥ (Alt) to place them freely. ⌫ deletes the selected annotation, and ⌘Z brings it back.
A newer run of the same video
Runs of the same video are versions of it. When you open a newer one that has no edits yet, and an earlier one has, the app asks whether to Carry over your corrections. Each is matched to the new run's faces, people, utterances and shots. Any that cannot be matched are listed in the Review tab, under Not carried over from the earlier run, not dropped. Start fresh leaves them behind.
Export
Export… at the top of the page, or File > Export… (⌘E), saves the video's annotations, with your edits
applied, to one JSON file (<video>.annotated.json). For each layer it records what the model found, what you
changed (each item is marked as the model's or yours), your annotation types and annotations, the full list of your
edits, and the most restrictive licence among the layers.
Import edits
File > Import Edits…, or Import edits into this video… in the video switcher, brings in edits from a file: an export from another copy of the app, for example a colleague's. Importing replaces this video's edits, and the app asks first. If the file does not say which run of the video it was made on, the app asks whether it was this one.
On Linux, which has no menu bar, Import, Export and Import edits are in the video switcher and at the top of the page.
See Keyboard shortcuts for every key.